How to Build a DIY Smart Irrigation System?
Summer is slowly approaching, and with it, new responsibilities in the garden. And there are certainly not a few of them. However, by setting up an automatic irrigation system, you can save around an hour a day, and it doesn't even have to be that expensive. If you choose the right products, you can build a smart watering system for just a few dozen euros. In this article, I'll show you a few ways to do it.
What Needs to be Addressed When Installing Irrigation?
Irrigation might seem very complicated, but it doesn't have to be if you look at it from the right perspective and understand a few basics. Right at the beginning, let's talk about the three fundamental things you need to address when installing an irrigation system:
- Water Supply
- Water Distribution Across Zones
- Water Distribution Control
All three aspects are interconnected, and it is necessary to evaluate how the final step will look while you are still working on the first one... But we will get to everything step by step.
Water Supply for Irrigation
The basic requirement for irrigation is water. It sounds trivial, but it's worth pausing to think about. During the summer season, a greenhouse or a lawn can drink up a considerable amount of water. If you supply it from the municipal water line, which is obviously the easiest method, it will definitely show up on your bills. However, irrigation can also be handled using rainwater, which we often have in abundance in retention tanks, especially after winter, or by using well water, which, of course, requires having a well. The somewhat good news is that if you have a new house, your building permit likely included that large 10m3 retention tank that shocked you with its price. Well, that tank is going to be very helpful now.
Using Municipal Water - As I mentioned, tap water is the simplest but also the most expensive option to operate. The water is readily available; you just need a hose outlet in the garden, and you basically have everything you need. If this is your case, you can move on to the next step, which is water distribution across zones.
Using Well / Retention Tank Water - Water from a well or retention tank can be used, and in fact, rainwater is often much better for irrigation than tap water. An ideal setup is, of course, a combination. When it comes to the technical requirements of using rainwater and well water for irrigation, they are practically identical. What you need is a pump that can push the water into your system. Simply put, a pump ensures that the water from the well or shaft behaves just like tap water. That means you have a hose coming from the tank with a valve, and when you open it, water flows out with a certain pressure. And here we must pause on those two facts – that the water will flow automatically and will have a specific pressure. These are crucial factors when choosing the right pump.
How to Choose an Irrigation Pump - Choosing a pump can be a nightmare. There are so many of them that one could go crazy comparing the parameters. To choose the right irrigation pump, you need to decide what pressure you need and accept the fact that the pump should be automatic, even though it's the pricier option. It makes installation tremendously easier and saves you from complex control setups.
What Pressure Should the Irrigation Pump Have? - The answer to this question is measured in bars, but fortunately, manufacturers often make our decision easier by dropping the necessary information right into the description. I'll refer to Gardena products in this article, which I personally favor. I'll also select submersible pumps, although surface garden pumps are also available and usable. With Gardena, it's worth looking at two pump types: either the Rain Water Tank Pump 4700/2 inox automatic or the Submersible Pressure Pump 5900/4 inox automatic. Of course, you can choose another type, but in my personal opinion, these two pumps perfectly cover the needs of both small and large irrigation setups. If you look at the 4700/2 model, the description says that thanks to its 2.3 bar pressure, it can power one large garden sprinkler, while the 5900/4 model, with its 3.5 bar pressure, can run up to three simultaneously. What does this mean? If you start the pump, water runs through a hose with sprinklers at the end. With the smaller version, only one sprinkler can be running at a time; with the larger version, up to three. If you turn on more at the same time, they won't spray due to a lack of pressure. Naturally, you can irrigate the entire garden even with the 4700/2 pump, but you will have to do it sequentially – we'll get to that in the next chapter.
When choosing the right pump, you can, of course, go with another brand. The important thing is that it must be a pressure pump. You won't achieve the pressure needed to run sprinklers using a standard clean water pump or a sludge pump.
Automatic Pump Function - The mentioned Gardena pumps have the word automatic at the end of their names. This is crucial if you don't want to physically turn on the pump every time you start watering. These models with automatic control are constantly in standby mode (consuming very little power) and wait for the water line to open so they can instantly start pushing water. This is a massive simplification for irrigation control. So, assuming we use a pump with automatic control, we just drop it into the tank or well, plug it into an electrical outlet, attach a hose (ideally a dedicated irrigation hose), and cap the hose with a connector. Done.
Water Distribution for Irrigation
We won't dive deep into the actual distribution of water around the garden in this article, because this topic is highly specific. Plus, Gardena has an excellent tool to solve this problem: the Garden Planner, where you can easily design everything. In this article, we will stick to the absolute basics: the water supply and a single irrigation zone – meaning what your pump or your tap water pressure can handle. For a truly simple setup, I must mention another great gadget: the very straightforward lawn sprinkler system from Parkside, as this brand offers an excellent price-to-performance ratio. A great way to combine Parkside and Gardena is for greenhouse irrigation. Here you can use the Gardena Master Unit (pressure reducer), which offers great value, and combine it with the Parkside Drip Irrigation Expansion Set for greenhouses. The Gardena reducer ensures that the water pressure moving from the main hose to the micro drip lines in the greenhouse is correct and doesn't burst them. The Parkside kit is perfectly compatible with Gardena's MicroDrip system, but at a fraction of the cost. This way, you can set up a drip irrigation system for your entire greenhouse for just a few dozen euros.
Controlling the Water Supply to the Irrigation System
And now for the most important part: controlling the water supply to your garden irrigation. Of course, there are dozens of products for this. Since we love finding solutions that you can integrate into your entire smart home ecosystem, we'll gladly advise you here as well. Both Gardena and Parkside have very similar products, but these are devices locked into their own proprietary systems. You would have to control your irrigation via one app and the rest of your smart home via another. Sure, it's not the end of the world, but it becomes a problem when it comes to automation. If you have everything nicely integrated into one system, you can easily set a rule that delays watering if your kids are currently running around on the lawn, and so on. Or exactly the opposite, let the fun begin, right? :)
Irrigation in the TUYA Smart Home
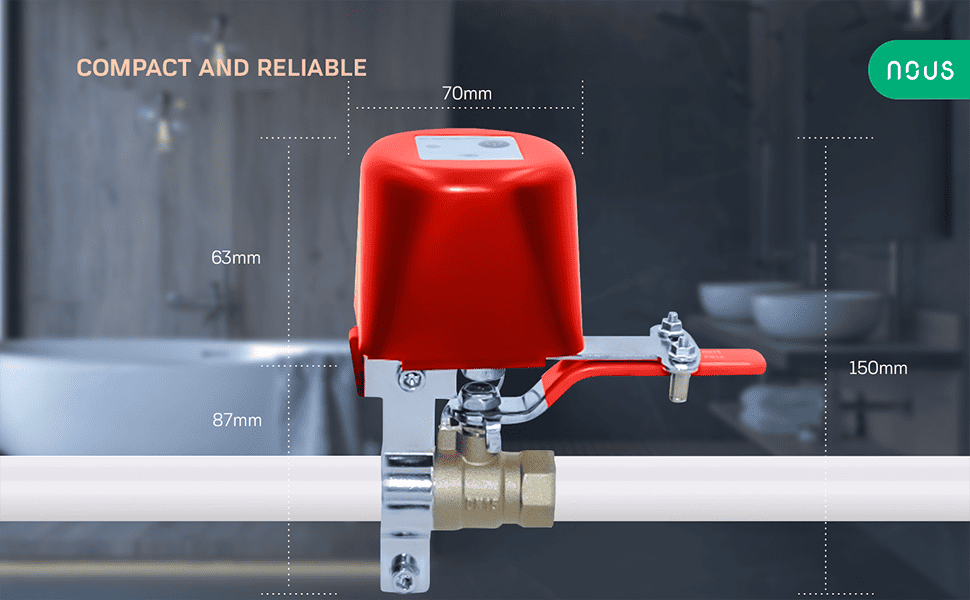
If you use TUYA products, we have two devices that look identical but operate on different protocols. It is the Nous L3 valve, which operates on WiFi, so you need absolutely nothing besides a WiFi network to use it, and the LZ3 version with Zigbee support for those who prefer this protocol in the TUYA app using a Zigbee bridge. We highly recommend the Zigbee version, and if you add a Zigbee gateway to your TUYA system, you can connect all kinds of Zigbee devices.
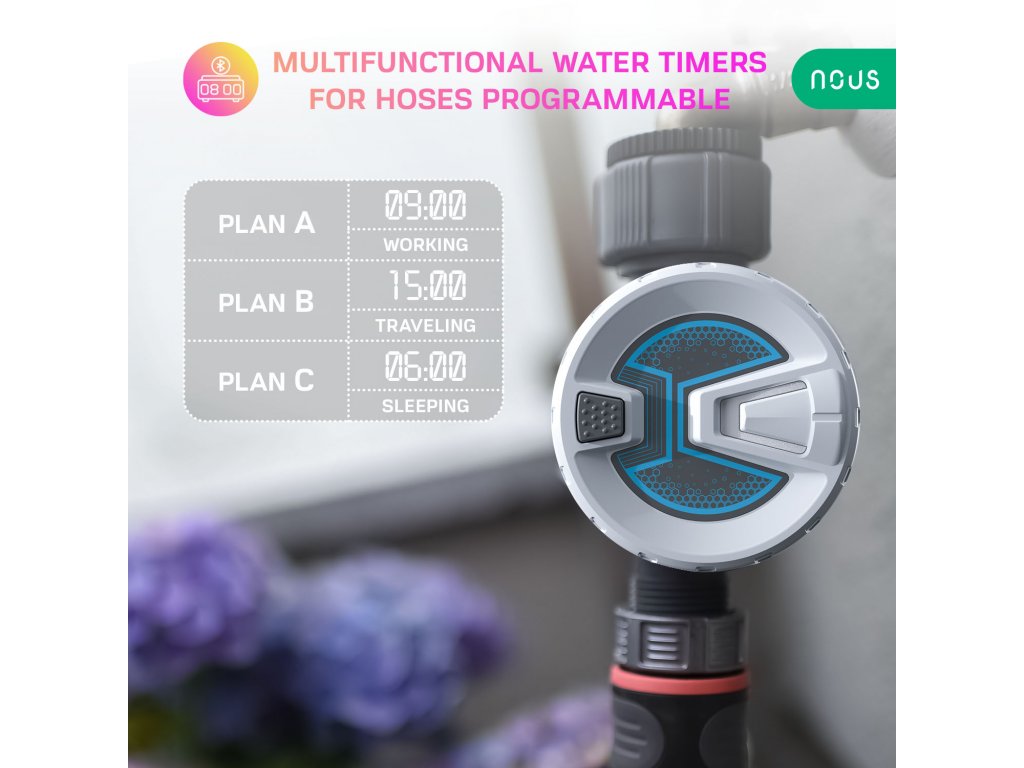
Another option for the Tuya app is using a Bluetooth irrigation timer, which is an excellent alternative. If you have a Tuya Bluetooth/Zigbee gateway, you can control it remotely. If not, you simply set it up once via your phone, and that's it. The timer will then automatically release water into the lines according to your schedule.
Irrigation in FIBARO and Homey Smart Homes
In systems like FIBARO and Homey, there are far more possibilities, but we can again use a simple water shut-off valve. If you use a controller with Zigbee support (HC3, Homey), you can once again use the NOUS LZ3. If you use Home Center 3 Lite or simply prefer the Z-Wave protocol, the FIBARO Water Valve is also a great solution.
However, as I mentioned, these systems are capable of much more. As part of your Smart Home, you can have complete control over your garden irrigation, including soil moisture sensors, rain gauges, and the like. The huge advantage here is that you don't need a secondary, dedicated irrigation controller. So if you are planning a professional irrigation setup from brands like Hunter or Rainbird, you only need to lay down the pipework and leave the control directly to your Smart Home. This saves you money on buying a dedicated irrigation hub. You can find more information about irrigation in the FIBARO system on our website, or you can watch a video tutorial on how to set up irrigation in FIBARO.
The irrigation methods discussed in this article are truly simple to set up. Thanks to these approaches and devices—which aren't even that expensive—you can save a lot of time every day. Moreover, if you use our tip for greenhouse drip irrigation, you will certainly enjoy a beautiful harvest.